

Building Computer Skills to Enable Success
Building Computer Skills to Enable Success

What is Microsoft Loop?
Microsoft keeps on adding tools to the 365 suite to make teamwork smoother, and one of the (relatively) new arrivals is Microsoft Loop. This flexible, collaborative app helps teams stay organised and work together in real time, no matter where they are.
In this article, Mark Finney, Co-Founder and Facilitator at Keystroke Learning, explores what Microsoft Loop is, how it works, and why it’s quickly becoming a go-to tool for modern workplaces.
About Microsoft Loop
Microsoft Loop is a digital workspace where you and your team can create, share, and update information instantly. Think of it as a combination of a whiteboard, a document, and a task list, all in one place.
The Loop interface is an infinite canvas, a bit like Notion. It allows a free form area for you to jot down ideas, work on content blocks, and rearrange and share with your team.
At the time of writing this article, I’ve found that Loop seems to be a bit of an unknown for the majority of Microsoft 365 users. When I’m facilitating, I often ask people what they know about Microsoft Loop, and I’m usually met with blank looks all round!
Hopefully, you’ll have a better understanding of Loop by the end of this article, and maybe you’ll even be inspired to give it a test run.
You’re may already be familiar with Teams, OneNote, or Planner. Loop combines the best of these tools while adding components. These are live, portable pieces of content such as tables, task lists, or notes. These components can exist purely inside Loop, or they can be shared across apps such as Teams, Outlook, and Word, staying perfectly in sync wherever they happen to be.
You might like to think of Loop components a bit like Lego blocks that you can assemble in lots of different ways. But in this case, the blocks will be updated in real time wherever they are. Ok, I know the metaphor breaks down a bit here, unless we’re talking about multidimensional Lego (there’s a thought), but hopefully you get the basic idea.
Anyway, what this all means is that anything in Loop can be turned into a Loop component and shared anywhere inside the Microsoft 365 ecosystem. Then, if someone updates a component in Teams, it automatically updates in real time back in Loop and Outlook too. No more confusion over multiple versions of the same content!
Why use Microsoft Loop?
At this point, you might ask yourself, “do I really need yet another Microsoft app?” Well, let’s have a look at how Loop might save you some time and effort:
- Centralised location – when you’re working together on a project, Loop can help to keep all the related content in one place.
- Real time collaboration – everyone sees the same version instantly, so any updates are immediately available.
- Flexibility – you can brainstorm ideas, track tasks, or draft documents, because Loop pages are totally customisable.
- Integration – Loop components work across multiple Microsoft 365 apps, so they can reduce the need to constantly switch between tools.
Because it’s dynamic, Loop can grow along with your project. You can start with a simple list, then expand it into a complete workspace with documents, links, and tasks as your project grows. Better yet, you can start with a workspace, then add contents as required for the project.
Microsoft Loop Fundamentals
When you open the Loop app in your browser, you’ll see three key elements:
- Workspaces –the virtual workspaces that act like central hubs that you can use to group all content related to your project.
- Pages – these are shared digital canvases adding Loop components and other elements for organising your information.
- Components – live, shareable content blocks that update everywhere.
These elements work together for effective collaboration with your team. For example, if you’re planning a project launch, you might do the following:
- Set up a Loop Workspace called Project QuickStart.
- Add a Page for Marketing Ideas, and another for project timelines.
- Create a Task List component.
Each page can then include one or more Loop components, which in turn could be embedded into emails, Team conversations, and more. As any component is updated in any of these places, it will update everywhere else.
SCREENSHOT
Getting Started with Loop
The key steps are:
- Create a workspace for your content.
- Add one or more pages to the workspace.
- Add elements such as text or Loop components.
- Share a workspace, page or component with your team and start collaborating.
Example
In the scenario shown below, I’ve logged into my 365 account and opened Microsoft Loop.
The Loop interface is clean and simple, displaying tabs on the navigation bar to the left. Clicking on Workspaces allows me to see the workspaces I currently have, and to create new ones.
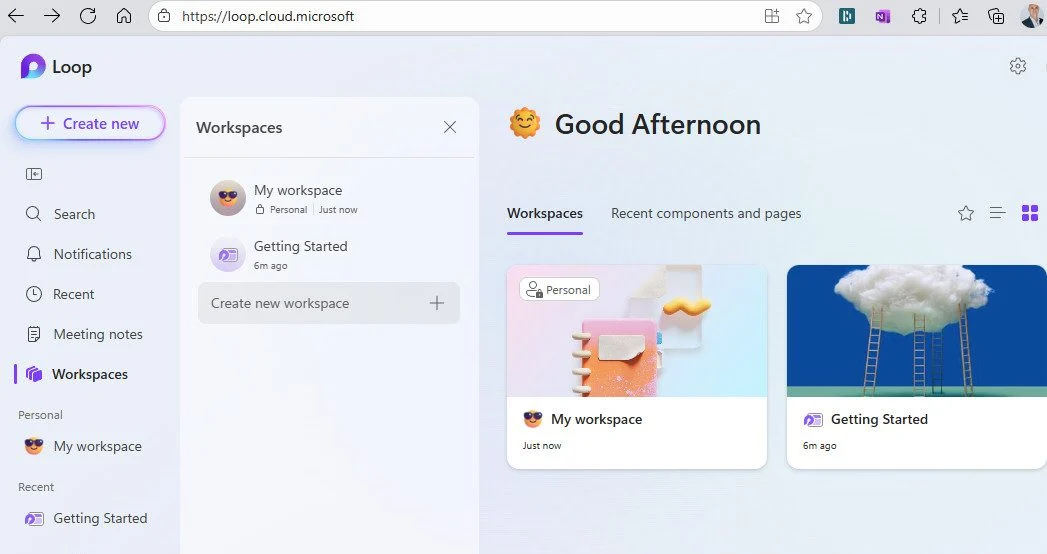
Creating a Loop Workspace
Clicking on Create new workspace opens a dialog box where I can type a name and add an emoji if I want to. I can update the cover to make it look nice, and I can set up sharing right away, but I’ll leave that for later.

Creating Loop Pages
My Project Launch workspace is created with a blank, untitled page. I can start adding pages and components if I want, but I can also use a template to help me get started. A set of templates appears at the bottom of the page, or I can open the Template Gallery to see more.
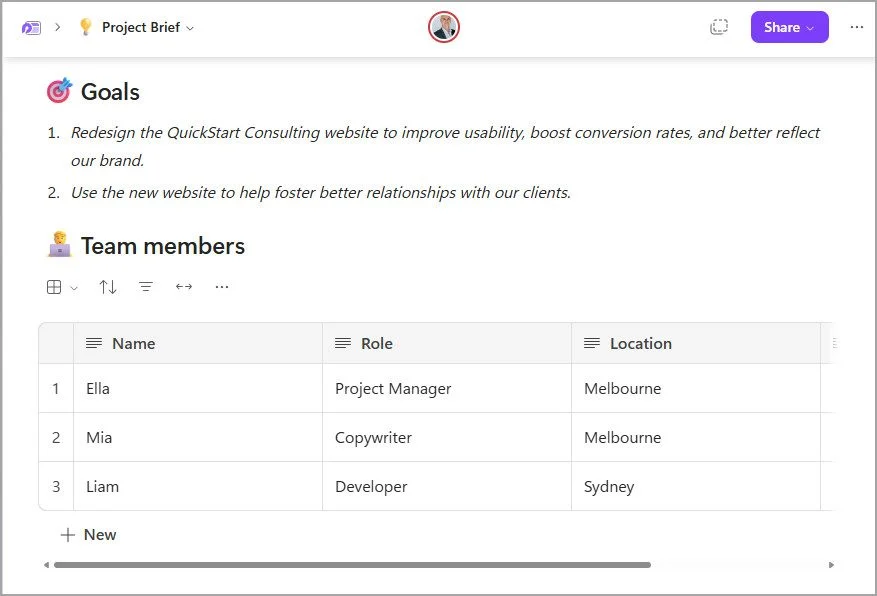
In the example below, I used the Project Brief template. It comes fully loaded with predefined sections and content that I can now customise for my specific project. What a great time saver!

Adding Content
Now that I have a page set up, it’s time to start customising the content for the project. I’ve added a couple of goals, along with a table of team members. I can come back any time to add more details as needed.
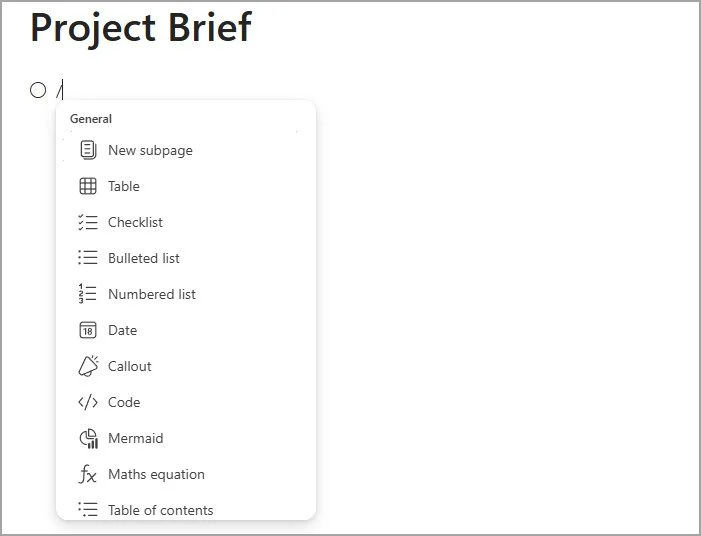
Having filled in the template, I want to add some custom content of my own. To add text or other elements, I can click on a blank part of the page, and I’ll be prompted to “Just start typing…”. But the secret sauce is where things get interesting. If I type a / to see a list of all the elements I can add to the page, including new subpages, Tables, Checklists, Bullets or Numbered list, and much more. I just need to select the item I want and start filling it in.
Using a Loop Component
Ok, this all looks very pretty, but now what? Let’s say I want to share this content with the team so we can start collaborating. That can be done in several ways. I can simply share the page or the entire Loop workspace, but I can also select any element on the page and turn it into a Loop component that can be embedded into other Microsoft 365 apps such as Outlook or Teams. Here’s how:
Click on the element to select it, then click on the six dot icon at the top left of the element. From the drop down list, select Create Loop component.
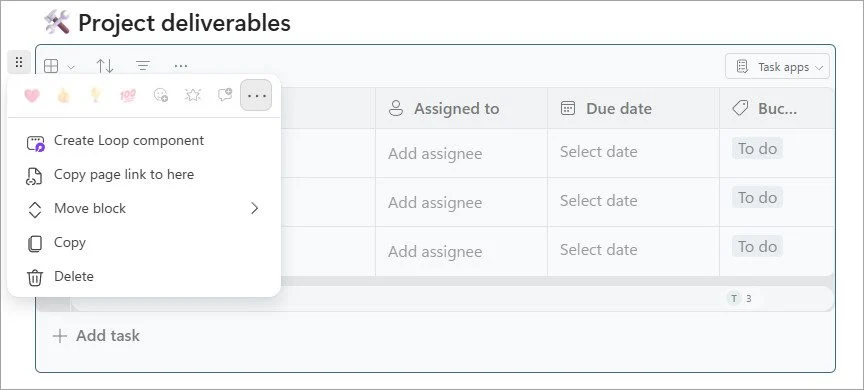
After a few moments, the item will appear with a border around it, and the Loop logo at the top left. This makes it easy to do a quick visual check to confirm that the element has been converted.
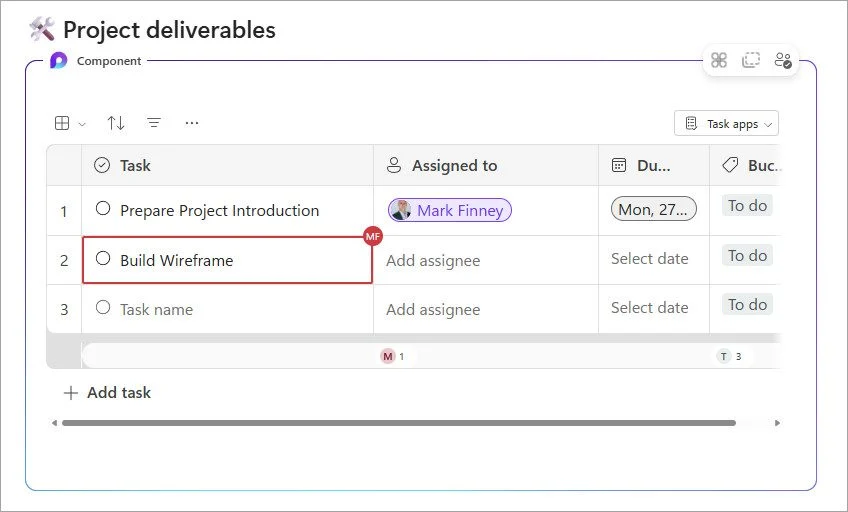
At the top right of the newly converted Loop component, you’ll see a copy icon. Clicking copy will create a copy link that I can simply paste into an email, chat or more. In the example below, I copied the task list component into Outlook. After receiving the email, the recipient has started filling in the list, which I can see updating in real time on my Loop page (how cool is that!)
The Loop component that my colleague is filling in.

And here’s the same component back in my Loop page!
Sharing Pages and Workspaces
Ok, it’s great to be able to share a Loop component, but what if I want to take it further and share a whole page, or perhaps the entire workspace? No worries, we can do that too!
Using the Microsoft Loop app, you can invite others to collaborate with you on an individual page, or the entire workspace. If you share just the page, the people you invite can only view and edit that page. If you share a workspace, each person you invite can view and make changes to any page in that workspace.
Share a Page
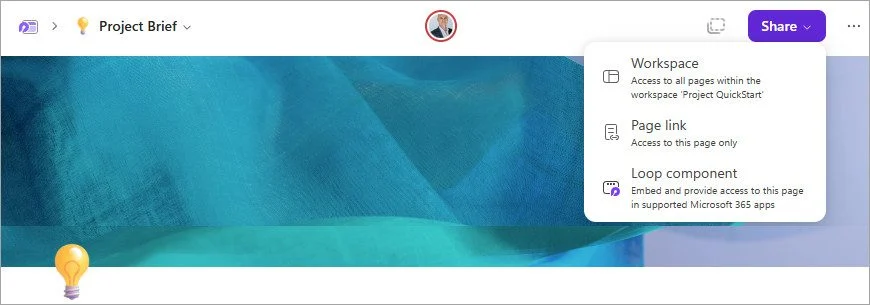
There are a couple of methods by which you can share a page:
- Page Link – when a colleague clicks the link, they will see the page open in a browser.
- Loop Component – turns the entire page into a Loop component, so it can be embedded into a supporting app such as Outlook or Teams.
Share a Workspace
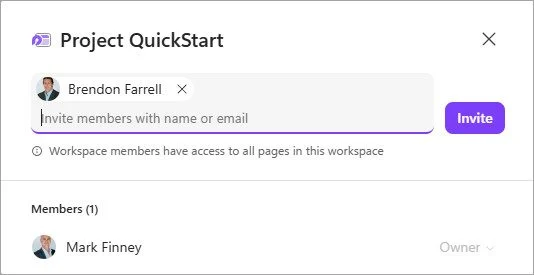
I can share a workspace from any open page in the main screen, or from the Loop home page.
In the example, I clicked on the Share button (just like in the previous example), then selected Workspace. A dialog box opens, where I can select the members that I want to share with.
Conclusion
Microsoft Loop is a fresh, flexible approach to collaboration. With live, shareable components and organised workspaces, it reduces duplication, keeps everyone aligned, and saves time switching between apps.
Next time you’re planning a project, running a brainstorming session, or managing a team task list, give Microsoft Loop a try.